
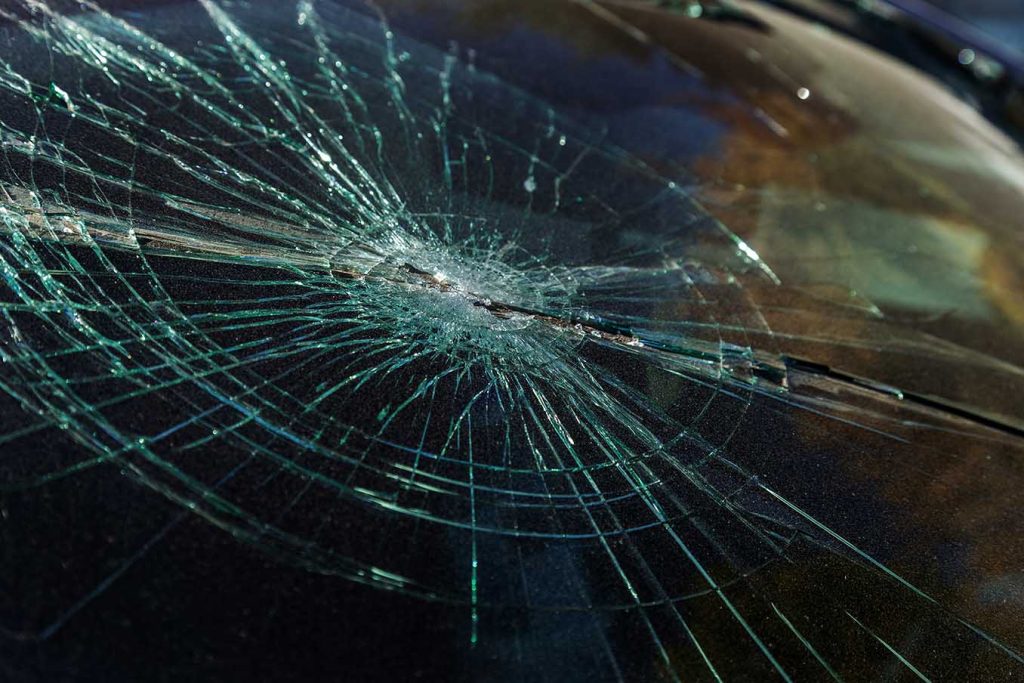
A chipped windshield can be annoying on a nice car, but it’s also dangerous. Whether a rock hit it on the road or there was a small accident, fixing it fast is important to stop it from getting worse and to keep your car strong. Luckily, you don’t always need to spend a lot at the auto shop to fix a small chip. With the right tools and steps, you can often fix it at home. This guide will show you, step by step, how to repair chipped windshield. It’ll help you make your car clear and safe again without spending too much time or money.
Chips and cracks on your windshield, whether from a rock hitting it or another impact, can get worse over time. If they get too big, you might have to replace the whole windshield. But did you know you can fix some small cracks and chips yourself? Here’s how:
- Get a windshield repair kit.
- Clean the chips and cracks on the glass.
- Use the adhesive patch and plastic pedestal from the kit.
- Use the syringe to put epoxy resin from the kit into the cracks.
- Take off the pedestal after the epoxy has hardened.
- Clean off any extra epoxy from the glass.
How Big Is Too Large?
At Home Auto Glass can fix chips and cracks bigger than a quarter. If the chip is smaller than a quarter, you can repair it yourself. Here’s how:
Windshield Repair
Purchase a windshield repair kit from your local auto parts store. Check the expiration date on the epoxy resin in the kit as it has a shelf-life. Make sure it hasn’t been on the shelf for more than six months.
Clean the area where you’ll do the repair well to ensure the adhesive sticks properly. Don’t spray glass cleaner on the crack or chip. Instead, pour a little rubbing alcohol onto a microfiber towel and wipe the surface. Use a thumbtack or pin to remove any glass fragments from the crack or chip.
If your epoxy resin repair kit needs UV light to cure, take your car out into daylight. Choose a sunny, warm day for windshield repairs. If it’s been raining, use a hairdryer to dry out the crack or chip.
Please follow the instructions provided with your kit. This guide can be used together with the instructions included in your kit.repair
How to Fix a Windshield in 10 Easy Steps
- Peel off the backing paper from the adhesive patch to uncover the sticky side. Make sure the chip isn’t bigger than the hole in the center of the patch. Stick the patch onto the clean, dry side of the glass facing outside. Remove the backing paper and attach the pedestal (the plastic piece with the tube angled up) to the adhesive. Align the tabs to make removal easier.
- If needed, mix your resin. Pour the resin liquid into the pedestal until it’s full. Insert the syringe firmly into the pedestal.
- Don’t worry, the resin won’t get sucked up if you hold the pedestal with one hand and slowly pull the plunger up with the other. Keep pulling the plunger until it stops. Some syringes have a clip to prevent accidental removal. The vacuum from the plunger will get rid of air bubbles from the chip or crack. Follow the instructions for the right time to leave the syringe in place. It could be 10 minutes or just 1 minute. Wait until the bubbles are gone before moving on.
- Hold the pedestal with one hand and remove the syringe with the other. Put the needle back in. Gently push the syringe plunger down to push resin into the crack or chip. Stop halfway or as the instructions say, or where the clip stops the syringe.
- Tap the window gently with your knuckles. This will let out any trapped air in the chip. If there’s still a small space not filled in the chip, press the syringe a bit more. Just don’t squeeze it more than half an inch, or you might mess up the adhesive seal.
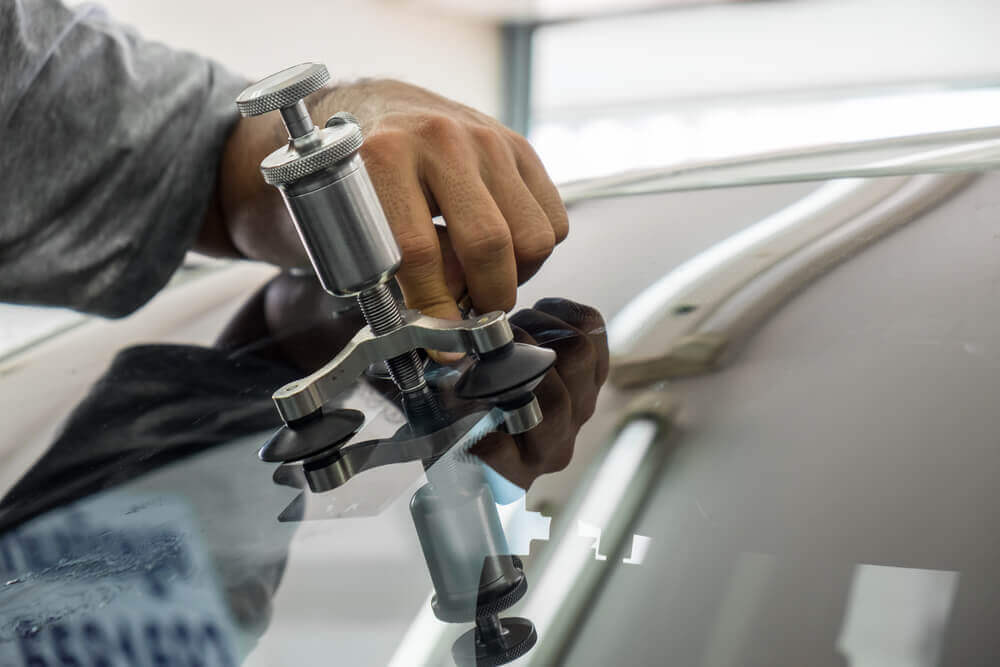
6. Check the instructions to see how long you should leave the syringe in place. Once the epoxy resin has cured, remove the adhesive patch, pedestal, and epoxy resin.
7. Don’t wipe anything! Drop a few resin drops into the tube and put them on each chip or crack.
8. Put the curing strip on your chip/crack and drop the resin. It should be at an angle to prevent air bubbles. Hold the strip gently with your fingers and use a razor to remove any air bubbles. Let it cure for the recommended time.
9. Take off the curing strip with a razor blade. Don’t just pull it off! Use the razor to cut the bond between the glass strip and the chip/crack. Then, twist off the strip. Be careful not to pull out any resin from the chip or crack.
10. Remove any leftover resin with a razor blade perpendicular to the glass.
Great job! You did it!
Windshield Chip Repair Professionals
You can let the pros handle your windshield repair. Call At Home Auto Glass. Our glass experts can fix or replace your vehicle’s windshield. Contact us at 941-260-2886 or book an appointment online.